Angular 1.5 and Typescript Best Practices - Part 1 Components
developmentAngular 1.5 and Typescript Best Practices - Part 1 Components
Why are you still using Angular 1?! If you want to use Typescript, Angular 2 is far better!
Angular 2 will be far better, and lots of it is far better right now but there still kinks to be worked out in the development stack (using 3rd party, non-es2015 module/typescript libraries from <npmjs.com> or GitHub, the Angular CLI, Angular 2 Material and other important feature libraries … don’t even get me started on the churn with the new router).
I was at NG-Conf the past two years and I think Angular 2 is awesome, but I have also built some cool apps and finished solid products for clients using Angular.js.
It has an established ecosystem and the framework is still awesome compared to what else is out there (especially when using newer features like components and Typescript).
There are plenty of style guides out there, hasn’t all this stuff been figured out already?
Well, yes and no. The popular style guides for Angular 1 by John Papa and Todd Motto are great resources and should be read by any developer working with Angular 1 and they still apply when working with Angular 1.5 (especially Todd’s) and Typescript.
But I feel this combination of technologies lends itself to new options in syntax and architecture.
Well then, show me something!
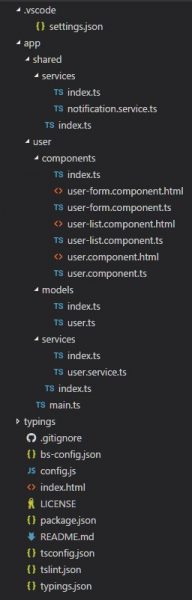
Below is an example of how I’ve been writing Angular 1.5 components in Typescript. The repository containing all of this example code can be found on my GitHub Here is the structure of the files in this demo app.
Models
The user.ts model class defines the structure of the data I’m passing between components. In this case it’s a User with an id and a name.
export class User {
  public id: number;
  public name: string;
}
Services
The user.service.ts is the layer between the components and the
API from which they get their data. In this example requests to and
responses from that API are simulated using angular’s
$timeout service which returns data in the form of a
User instance.
import { User } from '../models/index';

import { INotificationService, NotificationService } from '../../shared/index';

export interface IUserService {
  saveUser(user: User): ng.IPromise<User>;
}

export class UserService implements IUserService {
  public static serviceName: string = 'UserService';
  public static $inject: Array<string> = [
    '$timeout',
    NotificationService.serviceName,
  ];

  constructor(
    private $timeout: ng.ITimeoutService,
    private notificationService: INotificationService
  ) {}

  public saveUser(user: User): ng.IPromise<User> {
    return this.$timeout(() => this.simulateSave(user), 3000);
  }

  private simulateSave(user: User): User {
    this.notificationService.showSuccess(
      `User ${user.name} successfully saved`
    );
    return new User(user.id, user.name);
  }
}
On line 1 I import the User model class used throughout the app to keep the fields I have available for that class strongly typed. On line 5 I use an interface to abstract away the actual UserService. This allows me the flexibility of potentially using different implementations of the service in different components and adding additional layers of abstraction if needed, but typically the benefit comes in easier unit testing. The UserService class implements the interface and exposes a static field serviceName which allows me to reference the class by a string name, which is required for angular’s DI system. The constructor, on line 13, allows me to strongly type any dependencies the service has and I use Typescript’s parameter properties to define the classes’ properties along with their access modifiers with the same name all in one expression. I export both the IUserService and UserService since there isn’t much else going on in this file (which makes it easy to spot the exports).
Components
User-Form-Component.ts
Here is the user form component:
import _ from "lodash";
import { User } from "../models/index";
import template from "./user-form.component.html!text";
interface IBindings {
[key: string]: any;
user: any;
onUserSave: any;
}
class Changes implements ng.IOnChangesObject, IBindings {
[key: string]: ng.IChangesObject<any>;
public user: ng.IChangesObject<User>;
public onUserSave: ng.IChangesObject<(param: { user: User}) => ng.IPromise<void>>;
}
let bindings: IBindings = {
user: "<",
onUserSave: "&"
};
class controller implements IBindings {
public static readonly componentName: string = "userForm";
public static readonly $inject: Array<string> = ["$log"];
public user: User;
public onUserSave: (param: { user: User }) => ng.IPromise<void>;
public componentState: {
isLoading: boolean
};
constructor(private $log: ng.ILogService) {}
public $onChanges(changes: Changes) {
if (changes.user && this.user) {
this.user = _.cloneDeep(this.user);
}
}
public $onInit() {
this.componentState = {
isLoading: false
};
this.$log.info("User Form initialized");
}
public saveUser() {
this.$log.info("Saving user");
this.componentState.isLoading = true;
this.onUserSave({ user: this.user })
.finally(() => this.componentState.isLoading = false);
}
}
export let UserFormComponent = { controller, template, bindings };User-Form-Component.html
<h4>Editing User {{ $ctrl.user.id }}</h4>

<input
  type="text"
  ng-model="$ctrl.user.name"
  ng-disabled="$ctrl.componentState.isLoading"
/>
<button
  ng-click="$ctrl.saveUser()"
  ng-disabled="$ctrl.componentState.isLoading"
>
  <span ng-if="!$ctrl.componentState.isLoading">Save</span>
  <span ng-if="$ctrl.componentState.isLoading">Saving...</span>
</button>
I’ll comment on a few things here that apply to some of the other components in the project.
Imports
import template from './user-form.component.html!text';On line 5 I use the SystemJs text plugin which inlines this template file into the ‘template’ variable at run/build time. There is also a custom template.d.ts typing which tells Typescript that this is ok! The nice thing about this plugin is that I don’t need gulp to do any builds (this is great for a project this small) and for production I only have 1 file to deploy as a bundle.
Bindings
interface IBindings {
[key: string]: any;
user: any;
onUserSave: any;
}
class Changes implements ng.IOnChangesObject, IBindings {
[key: string]: ng.IChangesObject<any>;
public user: ng.IChangesObject<User>;
public onUserSave: ng.IChangesObject<
(param: { user: User }) => ng.IPromise<void>
>;
}
let bindings: IBindings = {
user: '<',
onUserSave: '&',
};class UserFormController implements IBindings {On line 7 I define an interface named IBindings which I use to ensure my component controller and changes parameter in $onChanges() have the same binding property names. I’ve found
that with a component architecture the bindings of the components become
more of a focus in the application and as I’m developing I’m often
refactoring the names of the bindings and which bindings exist since they
define the public API of the component to the application. What I don’t want
to happen is to forget to update those bindings each place their used
throughout my component file whenever a change is made. I also like to have
that API front and center so that when I want to re-use or debug the
component I know what I should be looking for. This is also the reason I
define a bindings variable directly below the
IBindings interface. The [key: string]: any; part
of IBindings satisfies the Angular type definitions for a component object’s
bindings property ( let bindings: IBindings = {}) - a necessary
bit of extra cruft at this time to make this all work. I also have a class
Changes which implements both IBindings and
ng.IOnChangesObject. This all ensures that my component object
bindings property has the same properties as my class and my
$onChanges parameter. The
IOnChangesObject interface gives my
$onChanges parameter even more intelligence with type checking
for something like changes.onUserSave.isFirstChange().
Note that none of this bindings stuff is required to make Angular or Typescript work but like I mentioned above, I have run into changing bindings coming back to bite me and since they are truly the public interface of the component, especially with non-trivial and often reused components, it can make sense to guard against typos.
I follow the **onNounVerb** pattern for event bindings, which isn’t required but it helps keep the names predictable. This also makes them easier to read and identify as HTML attributes in templates.
Component plumbing
public static readonly componentName: string = "userForm";
public static readonly $inject: Array<string> = ["$log"];
The controller class has two static fields. The first is the
componentName which is what I use in my call to
angular.component in main.ts to make sure I don’t
have any typos. It is also the pattern to use this component in a template.
Keeping this at the top of the class is a nice reference of an
implementation detail and a defining characteristic of the component. This
is the component version of the serviceName static field I use
in my UserService above. The second static field is
$inject which is the list of keys of injectable dependencies
that Angular 1 requires to match up the controller’s constructor parameter
list with objects the framework knows about. I have used the angular
annotate plugin for gulp in the past and while I like it, as mentioned
earlier, I’m not using gulp in the project, so manual wiring of the
injectables is required. It’s not as bad as it seems and with a component
architecture each piece is doing less so the list of dependencies is often
much shorter.
Binding in Typescript
The UserFormController implements the
IBindings interface which means it needs to expose a
user and onUserSave field or property.
public user: User;

public onUserSave: (param: { user: User }) => ng.IPromise;
On line 30 is the first of the two component bindings which satisfy the IBindings interface and match the bindings variable. The first is the user field of the class which is of type User. This is a one-way-binding of information coming into the component.
The second, onUserSave, is a callback or event binding (I use both terms interchangeably) which allows the component to send information back up to any parent context. Due to the
way the way that callback bindings are implemented in Angular 1 it is
necessary to wrap any information you would like to pass to this callback in
an object with a property that matches the name of the parameter of the
callback function being bound to. To represent this in Typescript, the
signature of (param: { user: User }) => ng.IPromise; matches
any callback function passed to the UserFormComponent that has
a parameter named user of type User which returns
a Promise of type void when called.
Although I don’t see it very often, it is absolutely possible to send information back to a child component through the return value of a callback function. For example, if
onUserSavereturned astringinstead of aPromisewe could write a statement likelet stringVal = this.onUserSave({ user: this.user });I don’t like the idea of circumventing Angular’s one-way-binding in/callback-binding out design by sending information back to the child component through that callback binding. It feels like a secret side channel of communication from the typical cyclical flow of component bindings. That said, I have found it beneficial to chain off promises returned by these callbacks to put my child components into different states if say, the parent is loading something or some other data which is expected to arrive is not yet ready for the child to consume. This, of course, can be accomplished through more bindings (for example anisLoadingbinding into the component) but it’s also advantageous to keep the binding API of a component small because that tends to mean the component itself is small and simple.
Component fields/state
public componentState: {
    isLoading: boolean
};
Following the class fields which contain those binding values is the field
which I use to represent the component’s internal state, which is why it is
named componentState. I tend to place anything that relates to
toggling UI elements, modes, Enums, ect… in this object. You can see it
currently has the Boolean property isLoading. I’ve found that
placing all values related to the visual or functional state of the
component into the componentState field to be helpful for
organization and readability. I try to contain mutations and state changes
inside my components to componentState and the component
bindings.
constructor(private $log: ng.ILogService) {}After all my class fields have been defined I define the class
constructor where Angular does its dependency injection magic.
I always use interfaces for my injected services for the sake of testing and
loose coupling. I don’t often place any logic in my constructor and instead
rely on the $onInit lifecycle hook but sometimes it’s necessary
to perform field initialization before then and the constructor is a good
place for that. You can see here I’m using the angular typings library.
Typescript knows that ng is a global object so I can refer to
it anywhere without an import statement. That ng object has as
properties all the Angular services, types or providers that I could want
access to. They are mostly interfaces and are mostly named how you would
expect. $q for example can be found at
ng.IQService. I always define these injected dependencies as
private (or protected if the class is using inheritance). These services are
not things I want exposed in my template and in order to keep my component’s
API small I expose the effects of injected dependencies through the
component class fields, methods or bindings.
Component Lifecycle
public $onChanges(changes: Changes) {
    if (changes.user && this.user) {
        this.user = _.cloneDeep(this.user);
    }
}

public $onInit() {
    this.componentState = {
        isLoading: false
    };

    this.$log.info("User Form initialized");
}
Next on line 40 is the first of the Angular 1.5 component lifecycle hooks. This post by Todd Motto on component lifecycle hooks
was a regular resource for me when I was first exploring all the new
features made available by the component API. I always place my hooks in the
same order, $onChanges, $onInit, (
$postLink), $onDestroy. I stick to this order
because this is the order that these hooks are called. When first using
components I spent a day quite confused because I though
$onInit always came first when in fact the binding updates in
$onChanges happen before the component has initialized. I use
lodash and its cloneDeep method to ensure that the
object reference connection between the component’s binding field’s value
and the parent component value are broken. Without
_.cloneDeep(this.user); I could change the internal properties
of this.user and have it reflected in the parent context. This is too close
to the two-way binding of directives pre-Angular 1.5 and in my experience it
makes it much hard to reason about the components, their communication and
their state.
I don’t use functions like
angular.copyin my code because the global angular variable isn’t there in Angular 2 (so why build legacy into my code if I can avoid it?) and I am usinglodashany way for an assortment of other use cases so I rely on it instead. On line 39 is$onInitwhere I normally initialize mycomponentStatefield and call any services that provide data the component depends on.
Component Methods
public saveUser() {
    this.$log.info("Saving user");

    this.componentState.isLoading = true;
    this.onUserSave({ user: this.user })
        .finally(() => this.componentState.isLoading = false);
}
Here on line 54 is the only normal public method of my class which happens
to be bound to an ng-click on a button in my component
template. This method performs a series of pretty common actions in my
component. First it does some setup, maybe constructs an object to be sent
to an API or toggles the state of the component. Then the action is
performed which here is calling the callback binding with the user object
which came in through the other binding. You can see how I chain a
.finally() off the Promise returned by the
callback binding so that I can set
this.componentState.isLoading to false again. Note, as
mentioned earlier I could avoid this back channel transfer of information
and instead add an isLoading binding to the component which the
parent could toggle on and off before and after communicating with an API,
for example.
Exports
export let UserFormComponent = { controller, template, bindings };Finally I construct the object Angular expects me to register as the
component and then export it using the ES2015 module syntax and
some
shorthand object initialization.
So how does this all work?
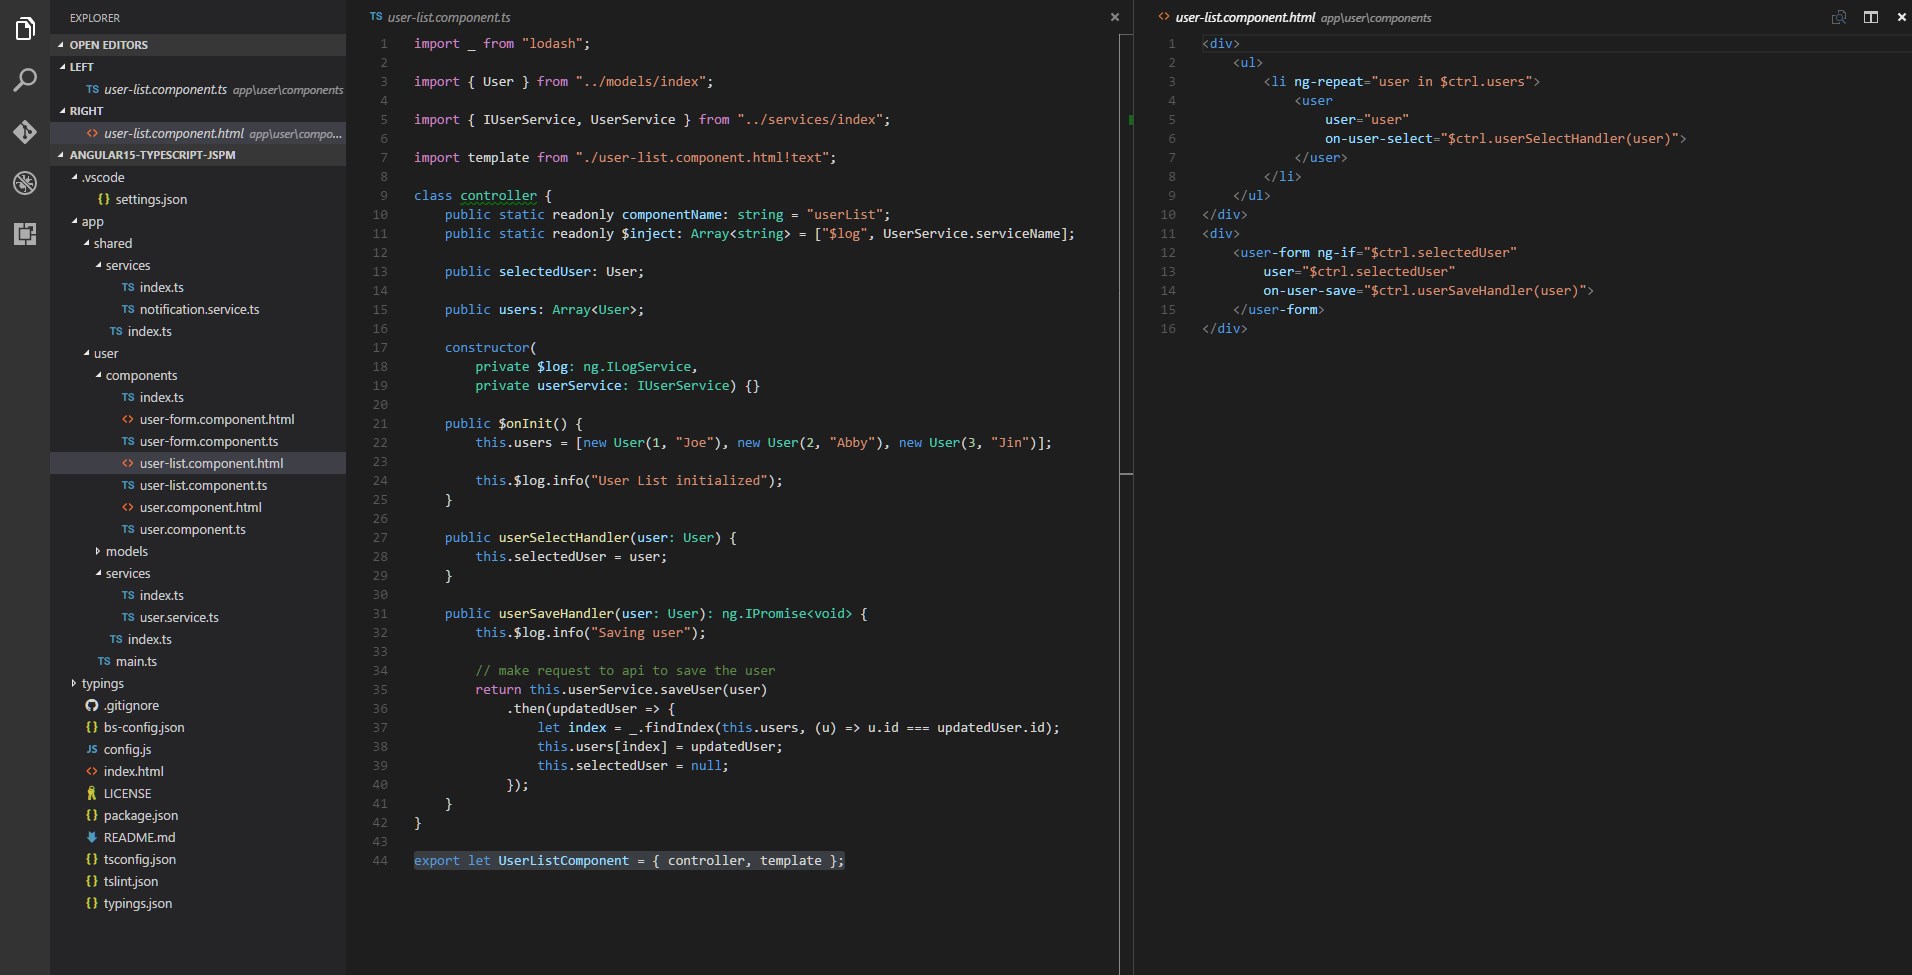
User-List.Component.ts
If we take a look at the user-list.component.html template things should start to come together.
<div>
  <ul>
    <li ng-repeat="user in $ctrl.users">
      <user user="user" on-user-select="$ctrl.userSelectHandler(user)"> </user>
    </li>
  </ul>
</div>
<div>
  <user-form
    ng-if="$ctrl.selectedUser"
    user="$ctrl.selectedUser"
    on-user-save="$ctrl.userSaveHandler(user)"
  >
  </user-form>
</div>
So we can see here that I have a repeated list of users all being bound to a
element (one of the app’s components) and below that is the component with
the exposed bindings. user is bound to the
user-list.component’s selectedUser field and the
on-user-save callback binding is bound to the
user-list.component’s userSaveHandler method. This
is another convention I use for components. All methods bound to callback
bindings of child components are named with the **nounVerbHandler**
pattern. Let’s look at the user-list.component.ts code.
import _ from 'lodash';

import { User } from '../models/index';

import { IUserService, UserService } from '../services/index';

import template from './user-list.component.html!text';

class controller {
  public static readonly componentName: string = 'userList';
  public static readonly $inject: Array<string> = [
    '$log',
    UserService.serviceName,
  ];

  public selectedUser: User;

  public users: Array<User>;

  constructor(
    private $log: ng.ILogService,
    private userService: IUserService
  ) {}

  public $onInit() {
    this.users = [new User(1, 'Joe'), new User(2, 'Abby'), new User(3, 'Jin')];

    this.$log.info('User List initialized');
  }

  public userSelectHandler(user: User) {
    this.selectedUser = user;
  }

  public userSaveHandler(user: User): ng.IPromise<void> {
    this.$log.info('Saving user');

    // make request to api to save the user
    return this.userService.saveUser(user).then((updatedUser) => {
      let index = _.findIndex(this.users, (u) => u.id === updatedUser.id);
      this.users[index] = updatedUser;
      this.selectedUser = null;
    });
  }
}

export let UserListComponent = { controller, template };
It might seem like a lot of new stuff is going on here but it’s mostly the
same patterns and conventions we looked at in
user-form.component.ts.
Imports
import _ from 'lodash';

import { User } from '../models/index';

import { IUserService, UserService } from '../services/index';

import template from './user-list.component.html!text';
First we import everything we need, including lodash, the
User model class, the UserService and its
interface and finally the component’s template, again using the
SystemJs text plugin.
Component plumbing
public static readonly componentName: string = "userList";
public static readonly $inject: Array<string> = ["$log", UserService.serviceName];
Here’s that component metadata again with the
componentName stating that it will appear in a template as
because of Angular’s conversion of camelCase to dash-case of selectors for
custom components/directives. We also see the advantage of defining the name
of a class as a static string field on that class. The
UserService is registered as a service in the app but to
satisfy dependency injection we need to have the same string name in the
$inject array as we do in the
angular.module().service() call. Using the static
serviceName field allows us to avoid magic strings and ensure
that the name we give Angular is the same name we spread around our app
wherever the dependency is required.
Constructor
constructor(
    private $log: ng.ILogService,
    private userService: IUserService) {}
In the constructor we ensure the dependencies are in the same
order as they appear in our $inject array.
Component Lifecycle
public $onInit() {
    this.users = [new User(1, "Joe"), new User(2, "Abby"), new User(3, "Jin")];

    this.$log.info("User List initialized");
}
We use the $onInit to set up some fake data the app will use to demo functionality.
Component Methods
public userSelectHandler(user: User) {
    this.selectedUser = user;
}

public userSaveHandler(user: User): ng.IPromise<void> {
    this.$log.info("Saving user");

    // make request to api to save the user
    return this.userService.saveUser(user)
        .then(updatedUser => {
            let index = _.findIndex(this.users, (u) => u.id === updatedUser.id);
            this.users[index] = updatedUser;
            this.selectedUser = null;
        });
}
These component methods are the handlers to the callback bindings of the
user-list.component’s child components (
UserComponent and UserFormCompnoent). They get
called whenever an event happens in one of the child components that it
deems important enough to alert the parent about. They both accept a
parameter of type User.
Since callback bindings have always seemed to confuse Angular developers, make sure to note that the parameter name in these methods does not need to match the name of the parameter used in the template but the name of the parameter used in the template does need to match the name of object property of the object passed to the callback binding in the child component. For example, I could change the signature of
userSaveHandler(user: User)touserSaveHandler(aUserToSave: User)and everything keeps working just fine, but if I update my template fromon-user-save="$ctrl.userSaveHandler(user)"toon-user-save="$ctrl.userSaveHandler(abcdefg)"then I will need to update the callback binding call insideuser-form.component.tstothis.onUserSave({ abcdefg: this.user }).
Export
export let UserListComponent = { controller, template };You can see here that this component has no bindings but the component
declaration and export look the same as the
user-form.component.ts.
The Final Pieces
The user.service.ts and user.component.ts are more of the same so you can explore those on your own. So lets just ahead to the final few pieces that make this all work.
main.ts
import * as ng from 'angular';

import * as shrdSvcs from './shared/index';

import * as userCmpt from './user/components/index';
import * as userSvcs from './user/index';

let moduleName = 'demo';

ng.module(moduleName, [])
  .service(
    shrdSvcs.NotificationService.serviceName,
    shrdSvcs.NotificationService
  )

  .service(userSvcs.UserService.serviceName, userSvcs.UserService)
  .component(
    userCmpt.UserFormComponent.controller.componentName,
    userCmpt.UserFormComponent
  )
  .component(
    userCmpt.UserComponent.controller.componentName,
    userCmpt.UserComponent
  )
  .component(
    userCmpt.UserListComponent.controller.componentName,
    userCmpt.UserListComponent
  );

let appRootEl = document.querySelector('#app-container') || document.body;

ng.bootstrap(appRootEl, [moduleName]);
This file is the root of the app and it’s where everything gets imported,
pulled together and registered with angular. You will notice on the first
line there is an import for angular import * as ng from "angular";.
Why is this imported here when Typescript considers ng to be a global object? Because our application has
angular.js as a dependency and needs it at runtime to function correctly.
This import, when combined with JSPM’s package management and
mapping in our config.js file and SystemJs’s browser module loader polyfill we can write import statements like these
and be reassured that our application will have everything, declare and
initialize it and do this in the correct order when the browser loads the
page. To state it a different way, the ng object we use in the
component files is part of Typescript’s Typing system, which tells Typescript what things look like, whereas this import in
main.ts is part of JSPM/ SystemJs’s module loading
system, which tells the browser how to do the things of tomorrow today. We
then import all the other parts of our app using relative paths and the ES2015 import syntax and import namespacing to group by module. Now that we have everything in one place we use Angular 1’s module API to register each piece to be used with dependency injection. Here again the .componentName and .serviceName static fields come in handy and turn code that would normally be full of strings into only functions, objects and properties.
Note that the imports for our modules are paths to index files that I haven’t discussed. These are ‘barrels’ which group up child module exports and re-export them up the hierarchy. If you take a look at the repository you can see how each folder in app has an
index.ts. These barrels don’t have any logic of their own so they do not import, only export.
Finally we use Angular’s manual bootstrapping process to keep our index.html
clean of any ng-app or ng-controller.
Side Note 1: Running, building and bundling
Config.js
If we take a quick look inside config.js, which is the
configuration for the browser System module loader polyfill, we see a
packages object.
packages: {
    "app": {
      "main": "main.ts",
      "defaultExtension": "ts",
      "meta": {
        "*.ts": {
          "loader": "ts"
        }
      }
    }
  },
This is what defines our main.ts (which is transpiled and loaded in the
browser thanks to the SystemJs Typescript-loader) as the entry point for our application. More information can be found on JSPM and SystemJs. You can also see a map object with a bunch of library: path
key-value pairs. JSPM manages this section of the file for when you type
commands like jspm install angular. The
"lodash" and "angular" strings here are the same
identifiers we used when importing them into main.ts.
Typings
Everything in the /typings folder is what allows us to know
what kinds of functions the angular and
lodash objects will have available at runtime but with
Typescript types. These libraries were not written in Typescript which is
why they require separate type definition files ( .d.ts) which
are placed in this /typings folder during an
npm install, with one exception. The
template.d.ts file is a manual addition that is required if we
want to use the SystemJs text plugin and import the text
content of our component templates directly into the component files.
template.d.ts defines a pattern for modules that end in
.html!text and states they all export a string -
which is what our HTML templates are. This makes Typescript happy and lets
us transpile to JavaScript without errors. Yay!
Index.html
The index.html is where our application runs and since we are using SystemJs for module loading in the browser we have to load up files a little differently than a traditional JavaScript web app.
<script src="jspm_packages/system.js"></script>
<script src="config.js"></script>
<script>
  System.import('app').catch(function (err) {
    console.error(err);
  });
</script>
First we load system.js which is in the root of the
/jspm_packages folder. This ensures the module loader polyfill
is running in the browser before we try to load any modules. Then we load
config.js which defines how all of our modules are mapped to
the filesystem and to each other. Finally we call
System.import("app") where "app" defines the name
of the package we wish to load (if you scroll back up you can see it’s the
name we give to the package with main.ts as its entrypoint.
System.import is asynchronous, which allows it to fetch modules
from a server on demand without blocking the page, but this means it also
returns a promise. We .catch any errors that importing
"app" might cause.
<body>
  <div id="app-container">
    <user-list></user-list>
  </div>
</body>
If you look back at main.ts you can see we bootstrap angular
onto an element in the DOM with an id of "app-container" and
here we have such an element with our root component in it.
Deployment Commands
In the package.json there is a list of
scripts which can be run at the command line to run/build the
app. The important ones are start and bundle:prod.
Running npm start will begin the entire transpiling,
file-change watching and web server running process. After everything is set
a browser window will open up and the app will load. The app will be running
off your local files and will be transpiled on the fly as you make changes.
The get the app into a deployable state, run
npm run bundle:prod. This will package the app and all of the
3rd party libraries into a single, minified production ready application
script in the form of build.js in the root of the project
folder. Copy the build.js to your server and add a script tag
referencing it along with the #app-container
div with the user-list element inside in the page
being served. The build.js contains all 3rd party libraries
installed via jspm and imported into your code (
/jspm_packages), our application ( /app), the
package configuration ( config.js) and the module loader (
jspm_packages/system.js).
Conclusions?
I hope I’ve made a good case for Angular 1.5, Typescript and JSPM as a trifecta of tools. I’ve achieved really good mileage with them and I expect I will continue to use them for some time as I (and everyone else) eases into Angular 2. Since so much of Angular 2’s shift in approach is related to the change from previously being a framework based on MVC to now being a Component architecture one, making that same shift with Angular 1 can prepare you for Angular 2 but in an environment you are familiar with. Typescript is gaining in popularity and while not a requirement for Angular 2 it is definitely a must if you want to be as productive as possible with the framework. It also brings advantages when used in teams, larger projects and newer developers who (like myself) don’t trust themselves to remember the types or structure of all their variables and objects. There are many front end build systems these days but JSPM should not be overlooked. Its ability to help you rapidly build up an application, manage client side dependencies, stick to the ES2015 module spec and provide cool plugin and bundling options makes it an extremely useful tool. Check out the repository and let me know your thoughts and suggestions. Happy coding!